In a nutshell
- 🌿 Diagnose first: distinguish underwatering vs overwatering by leaf texture, pot weight, soil gaps, smell, and root colour before attempting a soak.
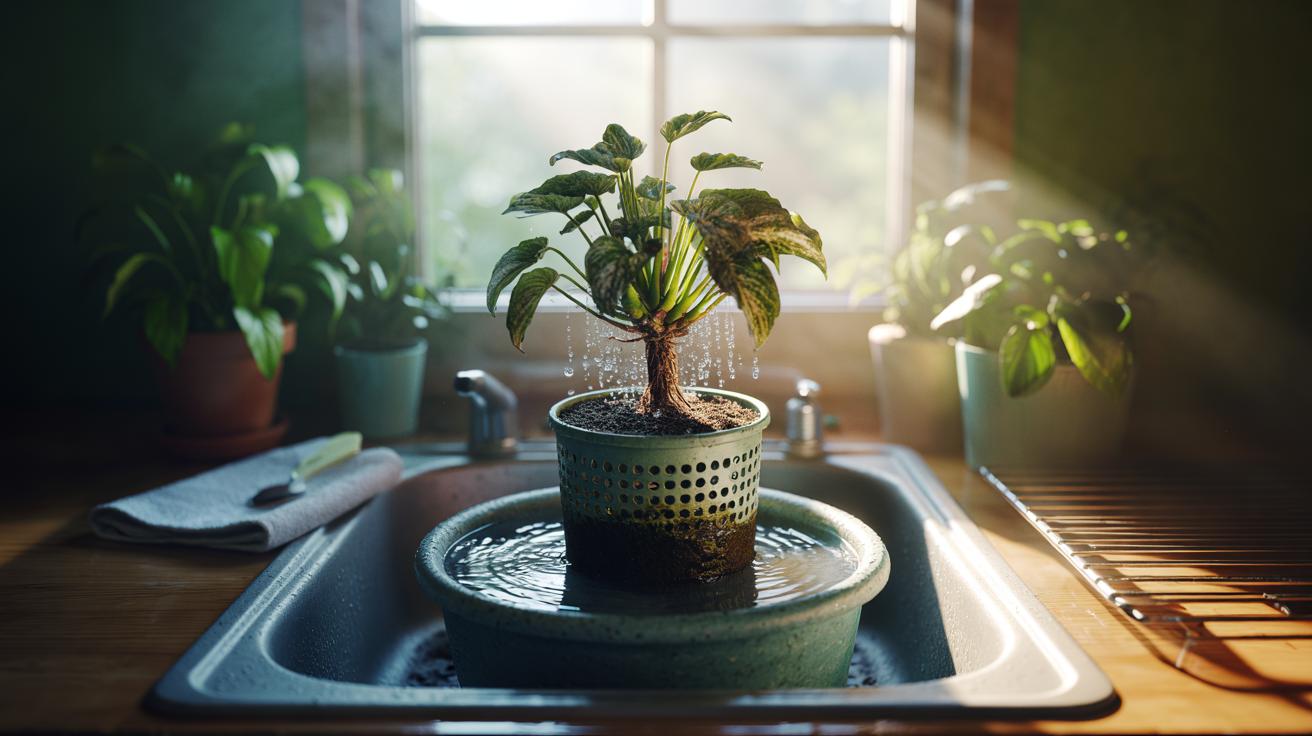
- 💧 Apply the water soak (bottom watering) method: set the nursery pot in lukewarm water 2–5 cm below the rim until bubbles slow and the topsoil darkens, then drain well.
- ⏱️ Mind timing and temps: morning soaks, tepid water, and species-specific durations; succulents short, ferns/calatheas longer—use the guide as a practical benchmark.
- 🛠️ Aftercare matters: ensure thorough drainage, hold fertiliser for 7–10 days, provide bright indirect light, and adjust watering rhythms to prevent repeat stress.
- ⚠️ Avoid pitfalls: never soak smelly, soggy compost (signs of root rot), skip ice-cold water and detergent additives, and keep orchids’ crowns dry.
Your once-lush philodendron is sulking. The soil looks dry, almost dusty, and water runs straight off the surface like rain on a waxed coat. Don’t bin it. There’s a simple fix that often works within hours: a careful water soak that rehydrates the entire rootball without drowning it. Garden centres call it bottom watering; I call it the houseplant defibrillator. It’s quick, calm, and surprisingly effective. The trick is knowing when to use it and when to step away. Get the timing right, use the correct temperature, and allow proper drainage afterwards. Then watch leaves plump, stems straighten, and colour return, as if someone turned the plant’s lights back on.
Spotting True Thirst Versus Terminal Decline
Dying or just dehydrated? It matters. A plant that’s genuinely thirsty shows flaccid leaves, crisp edges, and a pot that feels implausibly light. The soil may have shrunk from the sides of the pot, creating gaps where water escapes rather than soaking in. You may notice faint wilting at dawn and dusk that lifts after watering. These are classic signs of underwatering.
Overwatering looks different: yellowing lower leaves, limpness with a heavy pot, and sometimes a sour, swampy smell. Mushy stems scream root rot. If the compost smells sour, do not soak—you’ll compound the problem. Slide the plant gently from its nursery pot. Healthy roots are cream to light brown, firm, and springy. In contrast, rotten roots are dark and slough off when tugged. Use the finger test to the second knuckle; dry throughout suggests rehydration is needed. A cheap moisture meter can confirm readings at the bottom of the pot, where trouble hides. Diagnose first. Act second. That order saves plants—and time.
The Water Soak Method, Step by Step
Prepare a basin, sink, or washing-up bowl with lukewarm water—roughly 18–24°C. Remove any decorative cachepot so you’re left with the plastic nursery pot and its drainage holes. Set the pot in water so the level sits 2–5 cm below the rim. You’re hydrating from beneath, coaxing water up through capillary action. Add a gentle splash of rainwater if you have it; London tap is fine for most plants, but very hard water can mark leaves. Optional: a tiny dose of a wetting agent can break stubborn, hydrophobic compost, but go sparingly.
Watch for bubbles—air escaping from dry soil. When the bubbling slows and the top of the compost darkens evenly, lift the plant out. Typical times range from 10 to 45 minutes depending on pot size and media. Never leave the rootball submerged overnight. Allow to drain thoroughly on a rack or towel for at least 15 minutes. Wipe any standing water from saucers to avoid soggy ankles. If the plant was severely desiccated, repeat a shorter soak the next day rather than one marathon dunk. That’s the difference between rescue and relapse.
Timing, Temperatures, and Soak Lengths
Soaks are best done in the morning, giving plants a full day to dry off and resume photosynthesis. Use tepid water—not cold from the tap, not bath-warm. Drastic temperature swings shock roots. In winter, keep the plant away from draughts while it drains. Succulents and cacti? Short soaks only. Ferns and calatheas? Slightly longer, as their fibrous roots and peaty mixes can become stubbornly hydrophobic. The table below offers practical ranges; adjust if your potting mix is unusually coarse or fine.
| Plant Type | Pot Size | Typical Soak Time | Notes |
|---|---|---|---|
| Succulents & Cacti | 6–12 cm | 5–12 minutes | Short, cautious; dry fully before next water. |
| Tropical Foliage (Monstera, Philodendron) | 12–20 cm | 20–35 minutes | Stop once topsoil darkens and bubbles cease. |
| Ferns & Calatheas | 12–18 cm | 25–40 minutes | Prefer evenly moist; monitor closely. |
| Orchids in Bark | 9–15 cm | 10–20 minutes | Do not soak crown; drain meticulously. |
If water still sheets off the surface after a full soak, your mix is severely hydrophobic. Gently poke a few holes with a chopstick to open channels, then give a brief second soak. Future-proof by mixing in perlite or bark to improve structure and prevent compaction.
Aftercare: Drain, Dry, and Diagnose
Post-soak, patience pays. Let the pot drain until no more drips emerge. Tip the pot slightly to release trapped pockets around the rim. A small desk fan on low for 10 minutes can help evaporate surface moisture without chilling the plant. Check the drainage holes; they must be clear. If roots are spiralling tightly, the plant may be rootbound, which hinders even uptake—consider repotting once it stabilises.
Hold fertiliser for 7–10 days; stressed roots can burn. Do not fertilise immediately after a rescue soak. Move the plant to bright, indirect light. Not full midday sun. Trim only leaves that are fully crisp or mushy; partial damage still photosynthesises, fuelling recovery. Within 24 hours the pot should feel heavier and foliage perkier. If not, reassess: is the room too cold? Is there hidden rot? Establish a new rhythm by watering when the top 2–3 cm of compost is dry for tropicals, and much deeper for succulents. Consistency, not heroics, keeps them alive.
Common Mistakes and When Not to Soak
Soaking is not a cure-all. If the compost is already wet and the plant is wilting, do not soak—that’s a classic symptom of rot, not thirst. Instead, unpot, trim rotten roots, and repot into fresh, airy mix. Avoid ice-cold water; it shocks roots and stalls recovery. Don’t soak plants in decorative pots without drainage; you’ll drown them invisibly. Terracotta will drink from the basin too—fine, but expect times to run longer.
Succulents deserve special caution. Overdo it and you risk stem rot. Give a brief soak, then maximum airflow and a long dry-down. For orchids, keep water away from the crown to prevent rot. And resist the temptation to add strong detergents or vinegar to “help” water penetrate: they can damage roots. If fungus gnats explode after a soak, allow a full dry cycle and top with horticultural sand to discourage larvae. The goal isn’t sodden. It’s evenly moist, then gently drying.
Done well, the water soak trick is quiet CPR for parched houseplants: simple, precise, and kinder than endless top-ups that never reach the roots. You’ll see leaves regain turgor, colours deepen, and growth resume within days. Pair it with better drainage, a realistic watering schedule, and mixes suited to each plant’s native habitat. That’s your long-term insurance. What’s the most dramatic revival you’ve pulled off at home—and which plant would you like to rescue next using this method?
Did you like it?4.5/5 (24)